Create a Bootable VistaPE USB Hard Drive or Flashdrive
Introduction
These instructions are currently a work in progress. I've tried to make the process as simple as possible and
have tested it on flashdrives as well as a USB hard drive (NTFS single partition).
Many thanks for those who spent the time helping with the procedures and testing that
went into creating these instructions.
Last updated March 24th, 2008
Step 1 - Use WinBuilder to build VistaPE
Create a VistaPE project using WinBuilder. If you need help using WinBuilder to create a VistaPE build,
you can find a lot of information on the
WinBuilder Forum and
VistaPE Forum.
NOTE: These instructions were created using WinBuilder 072a and VistaPE 10. However, the procedure is
the same when using WinBuilder 074 and VistaPE 11.
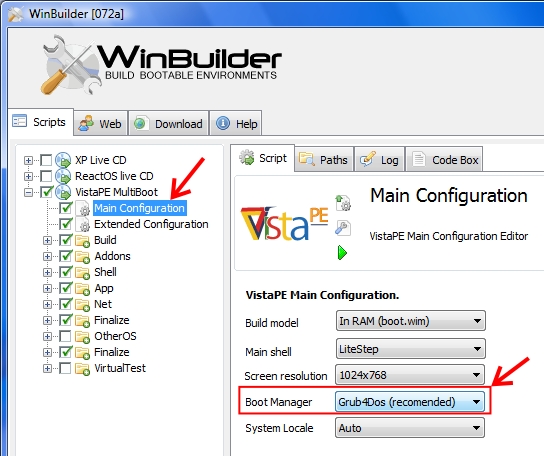
When creating your VistaPE build using WinBuilder, there are several important settings that need to be correct in order for the build to work properly.
Under Main Configuration make sure the Boot Manager is set to Grub4Dos (this is the default).
Figure 1a
Figure 1b (removed)
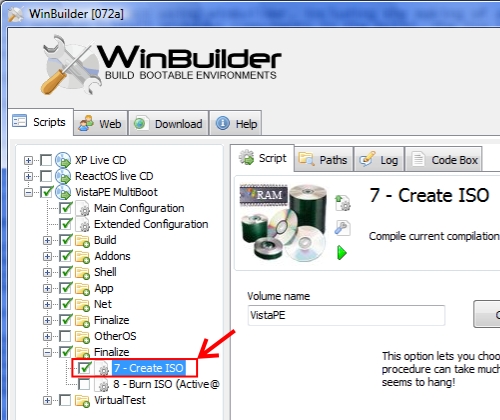
Under Finalize, make sure Create ISO is checked.
The ISO image is needed to make the program install the Grub4Dos components in the build.
Figure 1c
Step 2 - Copy VistaPE files to the USB Device
Plug in your USB Device (either a USB hard drive or flashdrive).
FORMATTING NOTES:
If using a flashdrive, it can be formatted as either FAT, FAT32 or NTFS.
If using a USB hard drive, it can be either FAT32 or NTFS. You may also choose to create a small (500MB - 1GB FAT32 or NTFS)
partition just for the VistaPE files and then create an NTFS partition in the remaining space to hold the
backup files.
Keep in mind, when partitioning your USB device, that the booting partition
(the partition holding the VistaPE files) can be either Primary or Logical.
Also, if your USB Device is already setup how you want, you don't need to
format the device and lose any files already on the device.
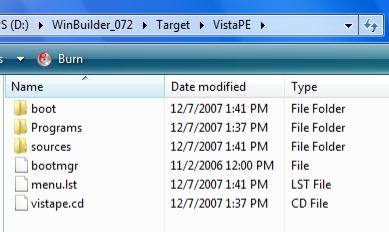
Open My Computer and browse to your WinBuilder folder.
Then browse to the sub-folder Target and then VistaPE.
Figure 2a
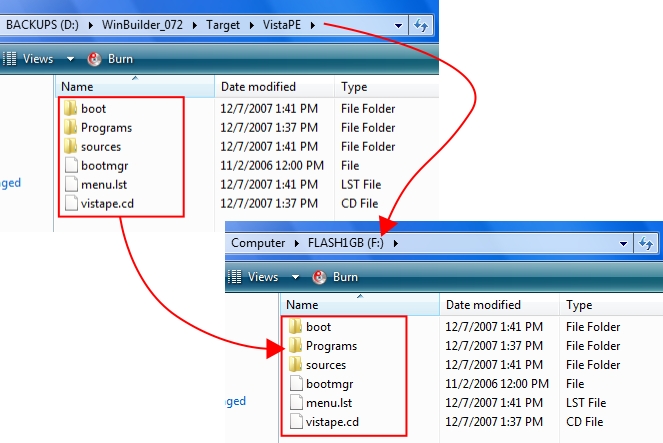
Select all the files and copy them to the USB Device.
NOTE: Depending on the options you selected in your
VistaPE build, your folders may look different. For example, if you used the option in the
Extended Configuration script to Force place all programs to RAM (boot.wim)
you won't have a Programs folder.
In the example below, I've copied the files
from D:\WinBuilder_072\Target\VistaPE to my flashdrive on F:\.
Figure 2b
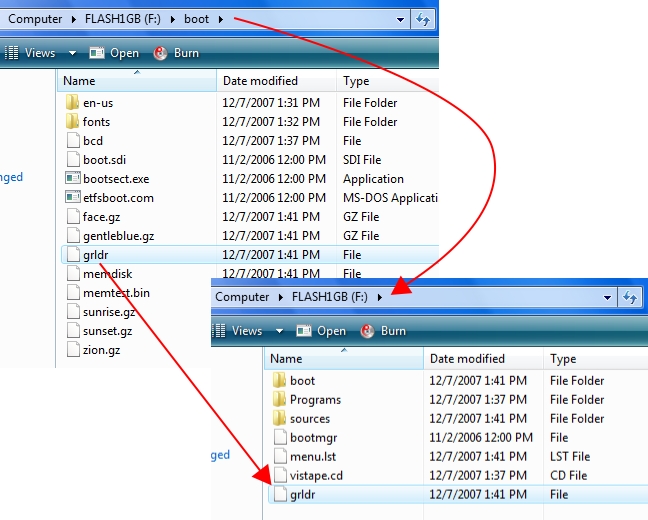
Step 3 - Move grldr
Copy or Move the file grldr from the boot folder on the USB Device
to the Root folder. Grub4Dos looks for this file in the Root of all partitions and uses the first one it finds.
Figure 3a
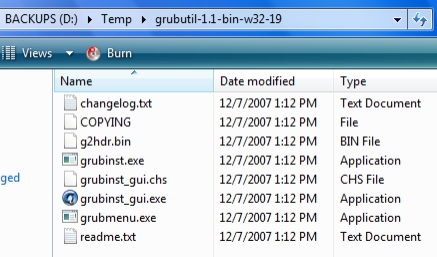
Step 4 - Install Grub4Dos to the MBR of the USB Device
Now you need to install Grub4Dos to the MBR of the USB Device. To do this, the easiest way is to use
the
grubinst_gui.exe utility.
Click here to download the program.
Extract the contents to a folder on your hard drive. In this example, I've extracted the files to
D:\Temp\grubutil-1.1-bin-w32-19.
Figure 4a
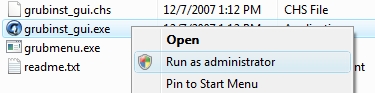
In Windows XP, just run the grubinst_gui.exe program.
In Vista, you'll need to run grubinst_gui.exe in Administrator mode. Right-click on the
program file and select Run as administrator from the pop-up menu.
Figure 4b
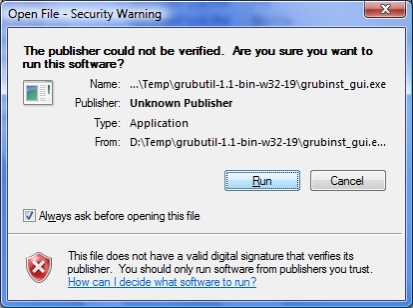
You may get a security pop-up window asking if you want to run the program. Select Run to start
the program.
Figure 4c
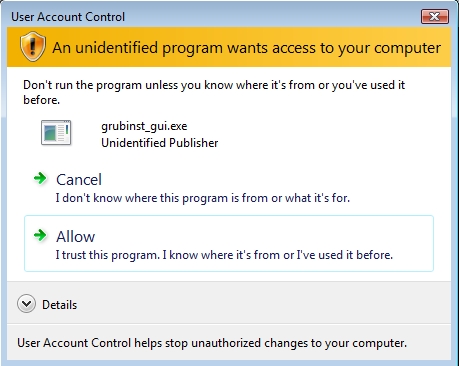
In Vista, if you have UAC turned on (the default setting), you'll get another warning.
Select Allow to let the program start.
Figure 4d
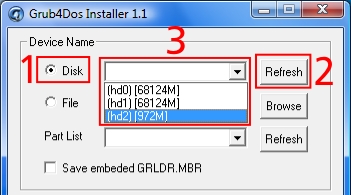
Once the program is started, select the Disk option, then click the Disk
Refresh button and then select your USB Device from the dropdown box.
Figure 4e
IMPORTANT NOTE: Make sure you select your USB Device from the dropdown list and
not a different drive. You should be able to tell which is your USB Device by the size shown for
each drive. In the above example, my 1GB flashdrive is easy to pick out.
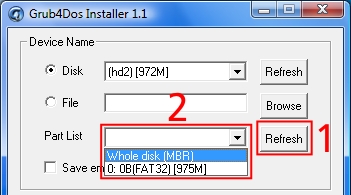
Now click the Part List Refresh button, then the dropdown box and finally select the
Whole disk (MBR) option.
Figure 4f
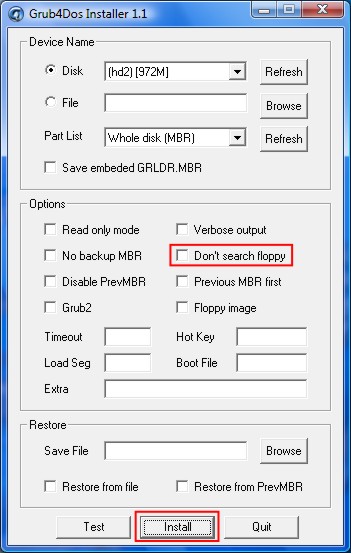
Leaving all the other options unchecked and cleared, click the Install button to
install Grub4Dos to the MBR of the Flashdrive.
NOTE: You may want to check the Don't search floppy checkbox before you install.
I have run it without this checked, though, and haven't had any problems.
Figure 4g
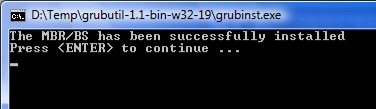
Hopefully, you'll get the message that the installation was successful. Press Enter to close
the Command Prompt window.
Figure 4h
Click the Quit button to exit the Grub4Dos Installer program.
Figure 4i
Step 5 - Boot your VistaPE USB Device
Your VistaPE USB Device should now be bootable. Leave the USB Device plugged in and reboot your computer.
Check the BIOS (if necessary) to make sure the USB Device is the first boot device. If everything works
correctly, the USB Device should boot to the Grub4Dos menu. Select VistaPE to start VistaPE.
Step 6 - Updating your VistaPE USB Device
If you make changes to your VistaPE build, you can update the files on the USB Device by
repeating Step 2 and copying the updated files to the USB Device. No further steps
are necessary.